Qt designer python tutorial
Qt designer python tutorial : The Qt is pronounced as a cute and free open-source toolkit used for creating GUI applications.
The Qt Designer will help you to build a GUI (graphical user interface) and load a GUI from Python.
You need to install,
- Python
- Pyqt
- Qt designer
We need a 32-bit or 64-bit installer which depends on the architecture of your system.
The file qt-unified-linux-x86-online.run is the 32-bit installer and qt-unified-linux-x64-online.run is the 64-bit.
You can run the Linux command arch and examine the output.
The output of "i686"will indicate 32-bit and "x86_64" is 64-bit on Intel.
Then install Designer (Ubuntu Linux) with:
Sudo apt-get install qttools5-tools
Sudo apt-get install qttools5-dev
We start the designer by writing the designer in the command line.
On Ubuntu Linux:-
Cd/usr/lib/x86_64-linux-gnu/qt5/bin/
. /designer

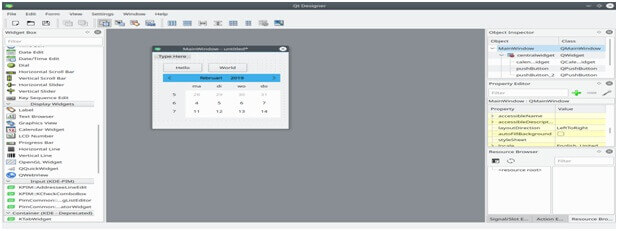
Then we choose the “Main Window” and click on create.
We can resize the form and drag and drop widgets.
Qt designer python tutorial
Export Design to UI:-
We Click File > Save As > yourname.ui and we convert the ui code to a python file.
Pyuic5/home/Linux/helloworld.ui-0 helloworld.py
Example to load ui file,
From pyqt5 import Qtcore, QtGui, QtWidgets
From pyQt.QtWidgets import QApplication
Import sys
Import helloworld
Class exampleApp (QtWidgets.QMainWindow, helloworld.Ui_MainWindow):
Def_init_ (self, parent=none):
Super(ExampleApp, self)._init_ (parent)
Self.setupUi (self)
Defmain ():
App=QApplication (sys.argv)
Form=ExampleApp ()
Form.show ()
App.exec_ ()
If_name_==’_main_’:
Main()
Qt Designer's Editing Modes
The objects on the form need to be placed into layouts that ensures the objects will be displayed properly when the form is used in an application.
Placing the objects in a layout also ensures that they will be resized correctly when the form is resized.
A top-level layout is used to ensure that your widgets will resize correctly when its window is resized.
Layout Objects:-
The objects are created by applying a layout to a group of existing objects.
It is achieved by selecting the objects that you need to manage and applying one of the standard layouts using the main toolbar.
The layout object can be selected and placed within the layout along with other widgets and layout objects to build a layout hierarchy.
Inserting Objects Into a Layout:-
The objects can be inserted into an existing layout by dragging them from their current positions and dropping them at the required location.
The cursor having a blue color is displayed in the layout as an object is dragged over it to indicate where the object will be added.
Types of layouts are:-
Horizontal and Vertical Layouts:-
It is the simplest way to arrange objects on a form is to place them in a horizontal or vertical layout.
The horizontal layouts ensure as widgets within are aligned horizontally, vertical layouts ensure that they are aligned vertically.
The horizontal and vertical layouts can be together combined and nested to any depth.
The Grid Layout:-
It can be created by placing objects in a grid layout.
The grid arrangement is much more suitable than a nested arrangement of horizontal and vertical layouts.
Qt Designer Manual:-
Here the Qt tool is used for designing and building GUI. Then we compose and customize windows also test them using the styles and resolution. The widgets and forms are created with Qt Designer and programmed code using signals. It can be changed within the code with features as a custom plug that allows you to use the components. The Qt designer will include four steps as, Choosing form and objects. Then lay objects out on the form Then we can connect signals to slots We preview the form.
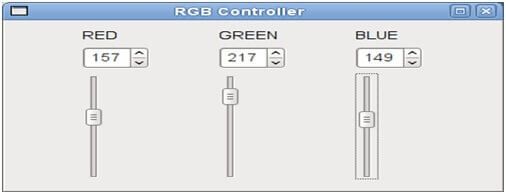
We design a small widget that contains the controls needed to manipulate Red, Green and, Blue (RGB) values.
Select the "RED" label and hold down Ctrl then select its spin box and slider.

We repeat the step for the other two labels along with their spin boxes and sliders as well.
The next step is to combine all three layouts into one main layout and the main layout is the top-level widget's layout.
The widgets on your window will not resize when the window is resized.
To set the layout we Right-click on your form of the three separate layouts, and select layout horizontally.
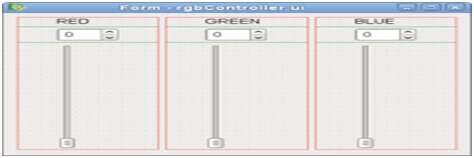
To do this, you have to switch to Edit Signals either by pressing F4 or selecting Edit Signals/Slots from the Edit menu.

We repeat the step and click on the spin box and dragging the cursor towards the slider.
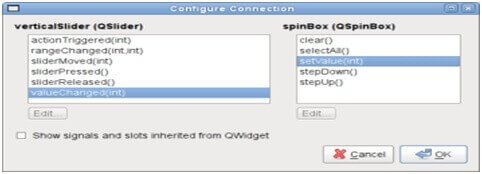
We have successfully connected the objects for the "RED" component of the RGB Controller, and repeat the same for the "GREEN" and "BLUE" components as well.
Qt Designer's Widget Editing Mode:-
The objects can be dragged from the main window's widget box to a form, edited, resized, dragged.
The properties can be modified interactively and changes can be seen immediately.
Here to create and edit new forms first open the File menu and select New Form.
The forms can also be edited by selecting Open Form from the File menu.
Editing a Form:-
They can be moved around simply by dragging them by using the cursor keys.
Then press the Ctrl key at the same time moves the selected widget pixel by pixel.
By using the cursor keys alone make the selected widget snap to the grid when it is moved.
They can be selected by clicking the left mouse button.
As we use the Tab key to change the selection.
The widget box contains objects in a number of different categories that can be placed on the form as required.
Action |
Shortcut |
Description |
Cut |
Ctrl+X |
It will cut the selected objects to the clipboard. |
Copy |
Ctrl+C |
Also copies the selected objects to the clipboard. |
Paste |
Ctrl+V |
It will paste the objects in the clipboard onto the form. |
Delete |
Delete |
And deletes the selected objects. |
Clone object |
Ctrl+drag |
Makes a copy of the selected object or group of objects. |
Preview |
Ctrl+R |
It shows a preview of the form. |
Advantages of using qt on mobile:-
- After writing the application in Qt and c++ in result windows RT is present.
- The domain will cooperate in an easy way and problem with speed.
- The Qt is a simple library so we want to write an app for the windows and Qt.
Disadvantages of using qt on mobile:-
- There is a lack of platform which supports the problem in Qt.
- The problems occur in the mobile version but ok in desktops.
- The startup time of application is more without using the Qt compiler.
